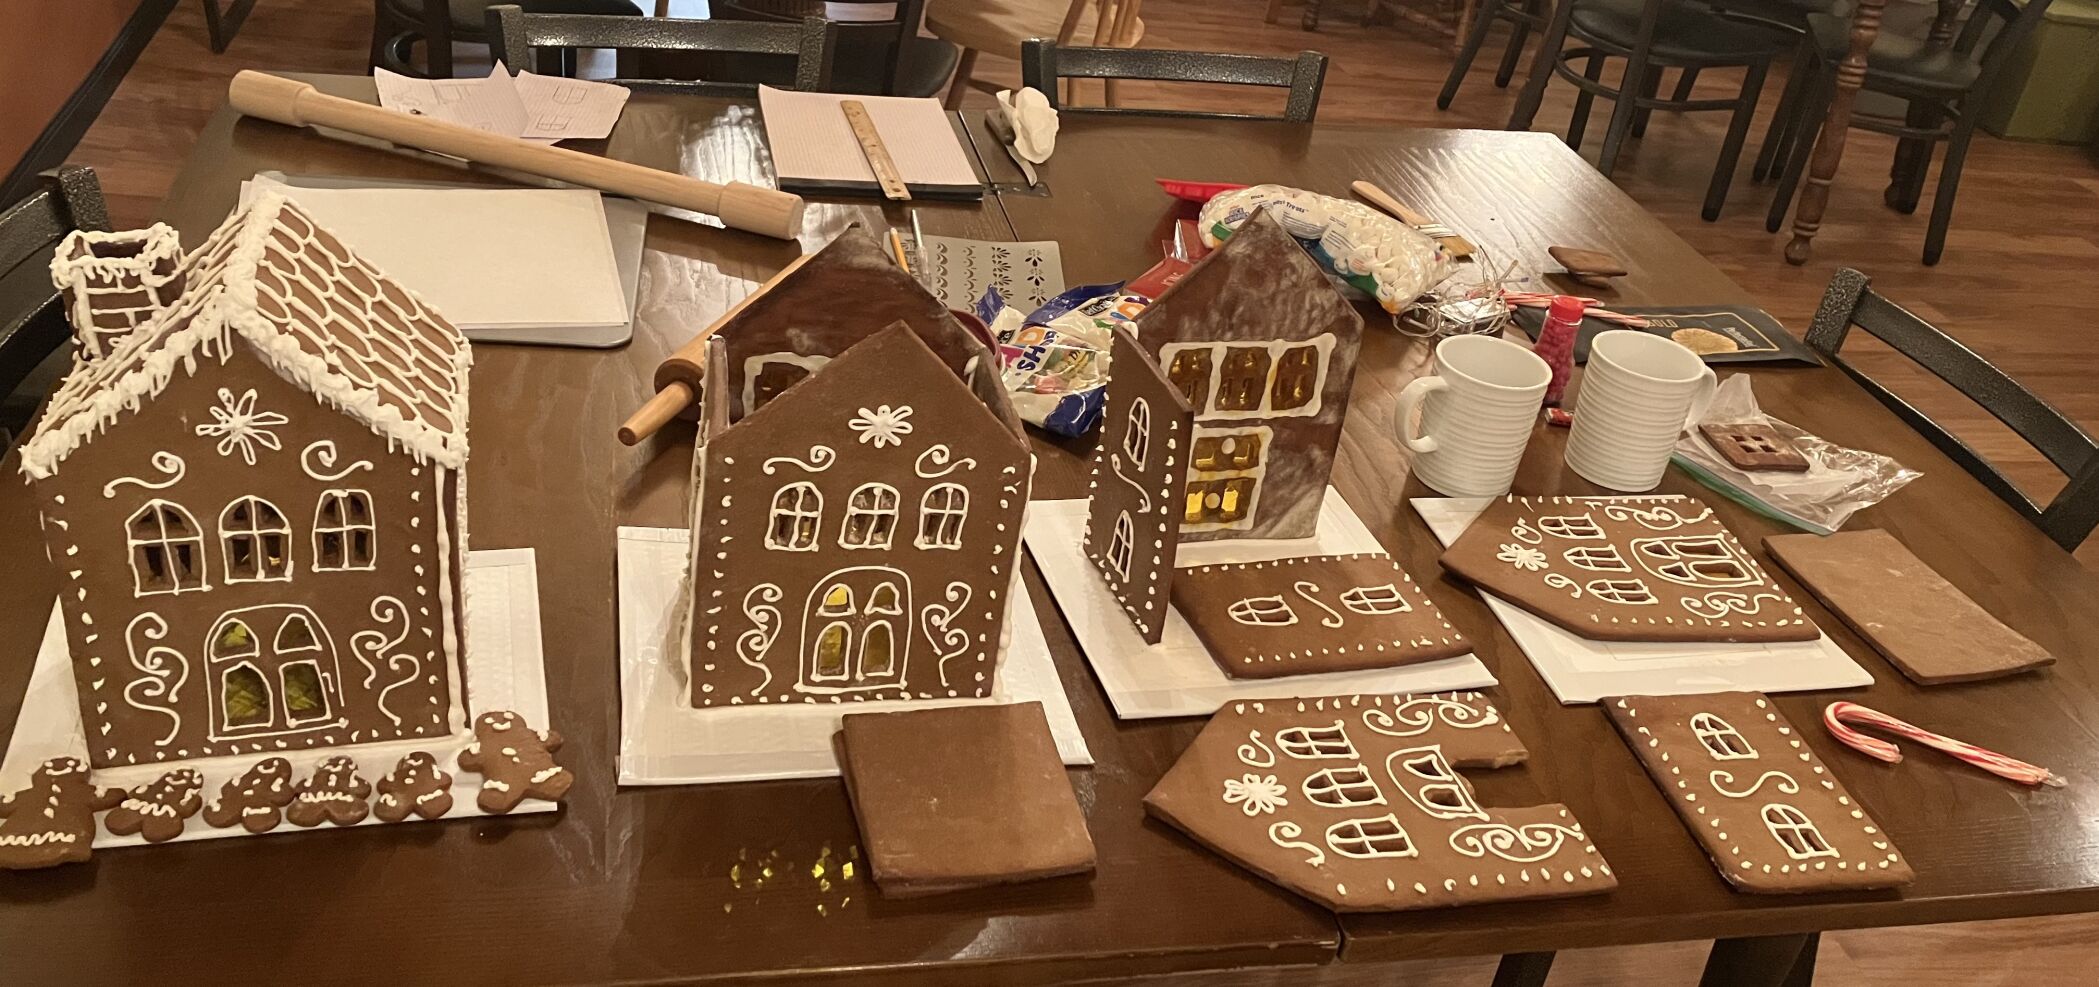
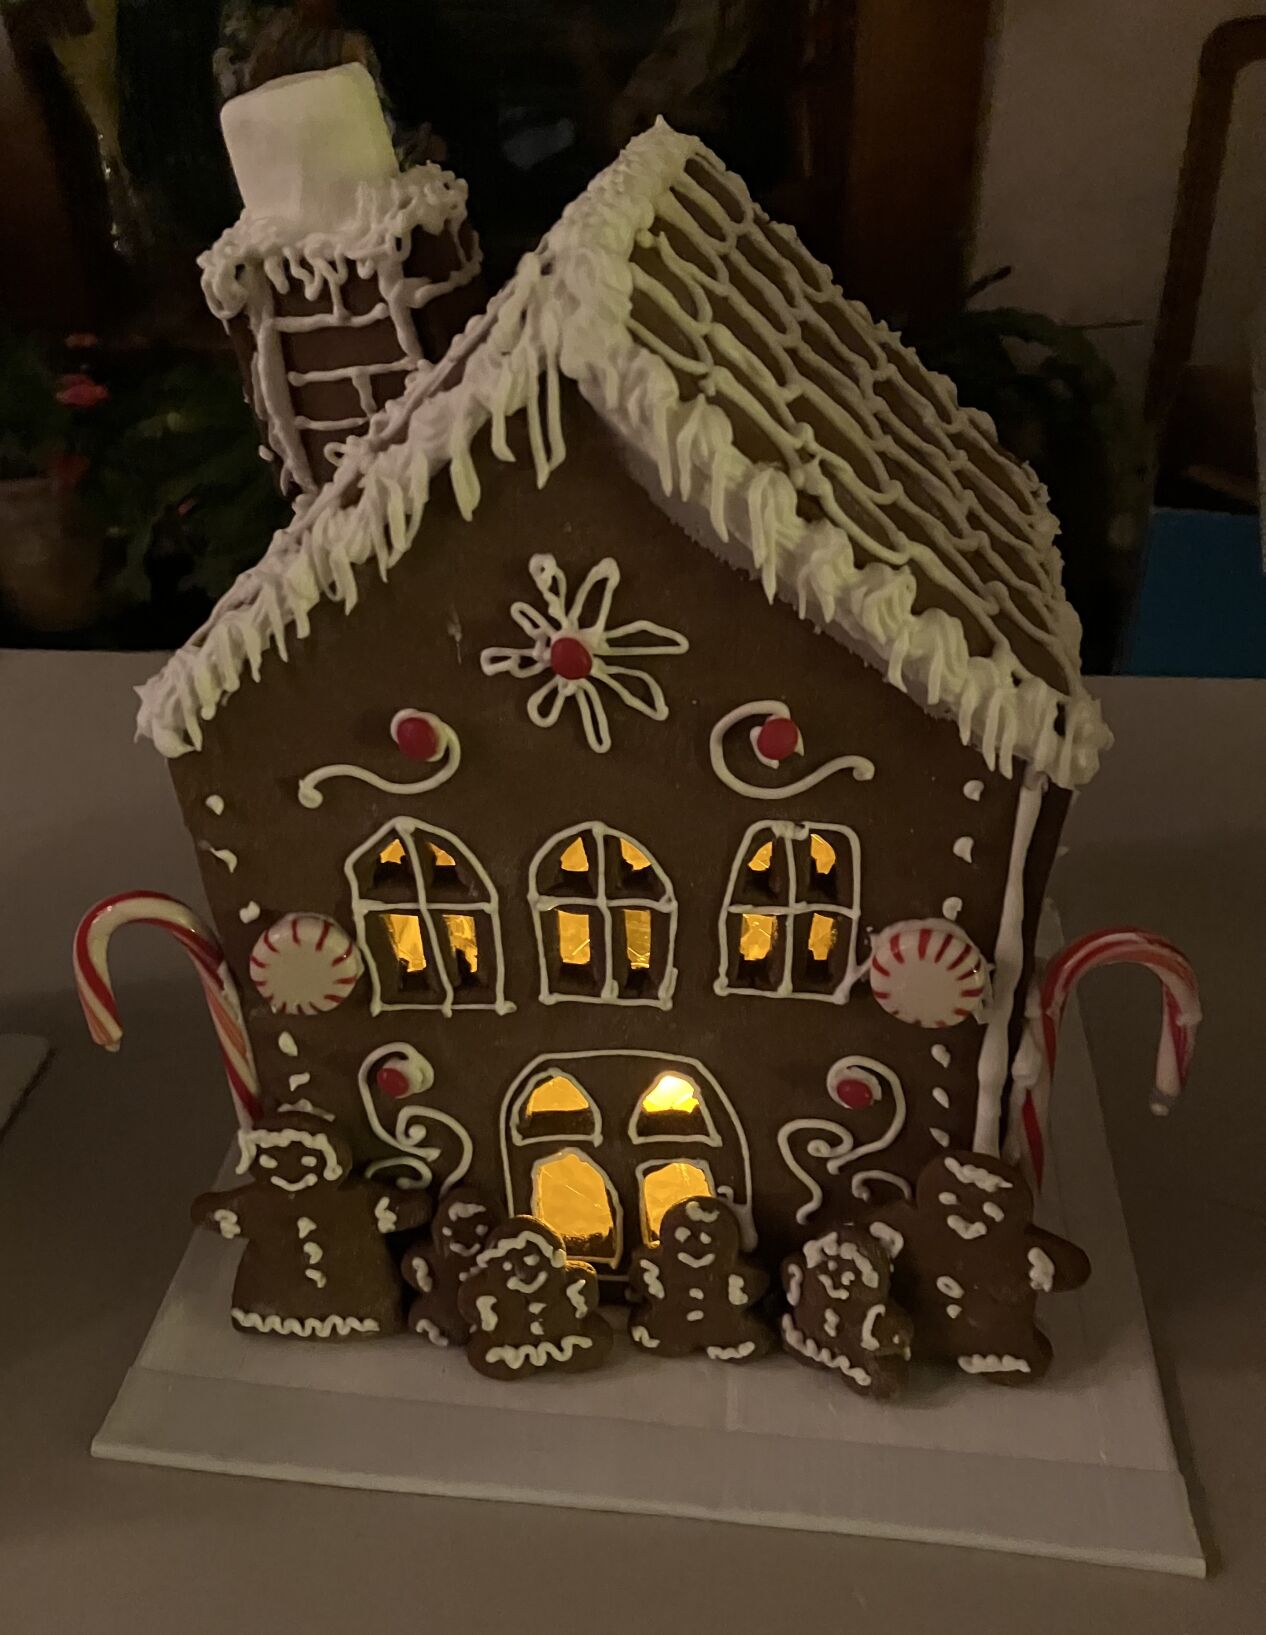
If you’ve ever made cut-out cookies, you can make a gingerbread house from scratch. Did your cottage from a kit collapse like a house of cards? Homemade royal icing is easy to make and a better cookie caulk than the stuff that comes pre-packaged. And nothing smells better at Christmastime than gingerbread in the oven. While it is possible to make your house in one crazy day, I recommend giving yourself several days or evenings. Spend an hour or less each evening for a week and end up with a sturdy, adorable building that will make a great Christmas centerpiece. The first December that I decided to make a gingerbread house, my husband, ever the optimist, wanted a replica of our home. He spent hours making a cardboard pattern of our 100-year-old, much-added-onto Craftsman. It had 16 pieces, many of them tiny and oddly shaped. We saved that for another year and instead made a building with four walls and two roof pieces. That’s what I recommend for a first project: A simple, four-walled cottage. You can still bling it up with plenty of candy doodads and frosting. Things you will need, besides the obvious measuring cups and spoons, spatula, etc.:
Flat cookie sheets (not the kind with rolled edges). Mixer. A standing mixer is great, but a hand mixer will do. Rolling pin. If using a standard rolling pin, use a ruler to check the thickness of the dough. (I just bought a rolling pin with end knobs that guarantee easily rolling out the dough to
¼
inch thickness.) A pattern. One is provided at TelegraphHerald.com. If drawing your own, use graph paper and a ruler. X-acto type knife, hat pin or large needle. Parchment paper. (Rolls are great, but it also comes in flat sheets online.) Disposable plastic pastry bags. Heavy drinking glass to support pastry bag. Piping tips in various sizes.
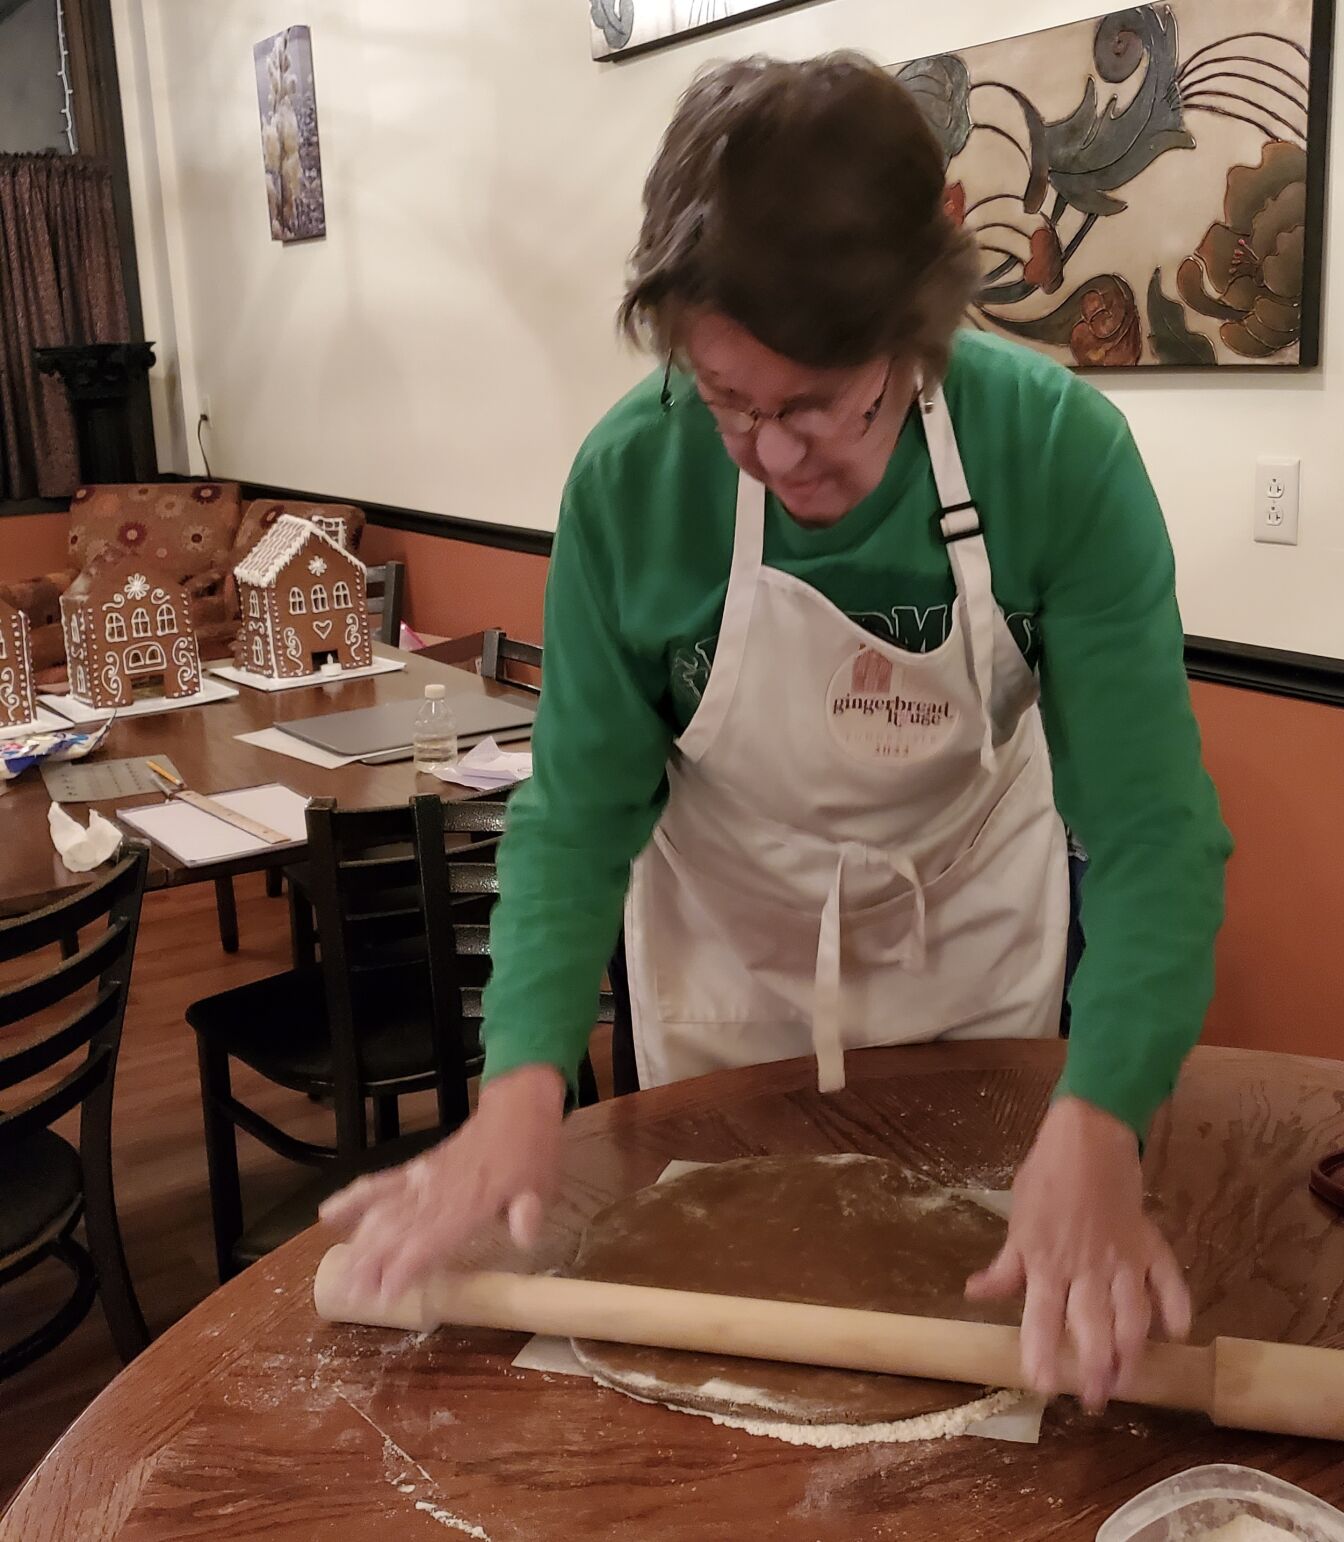
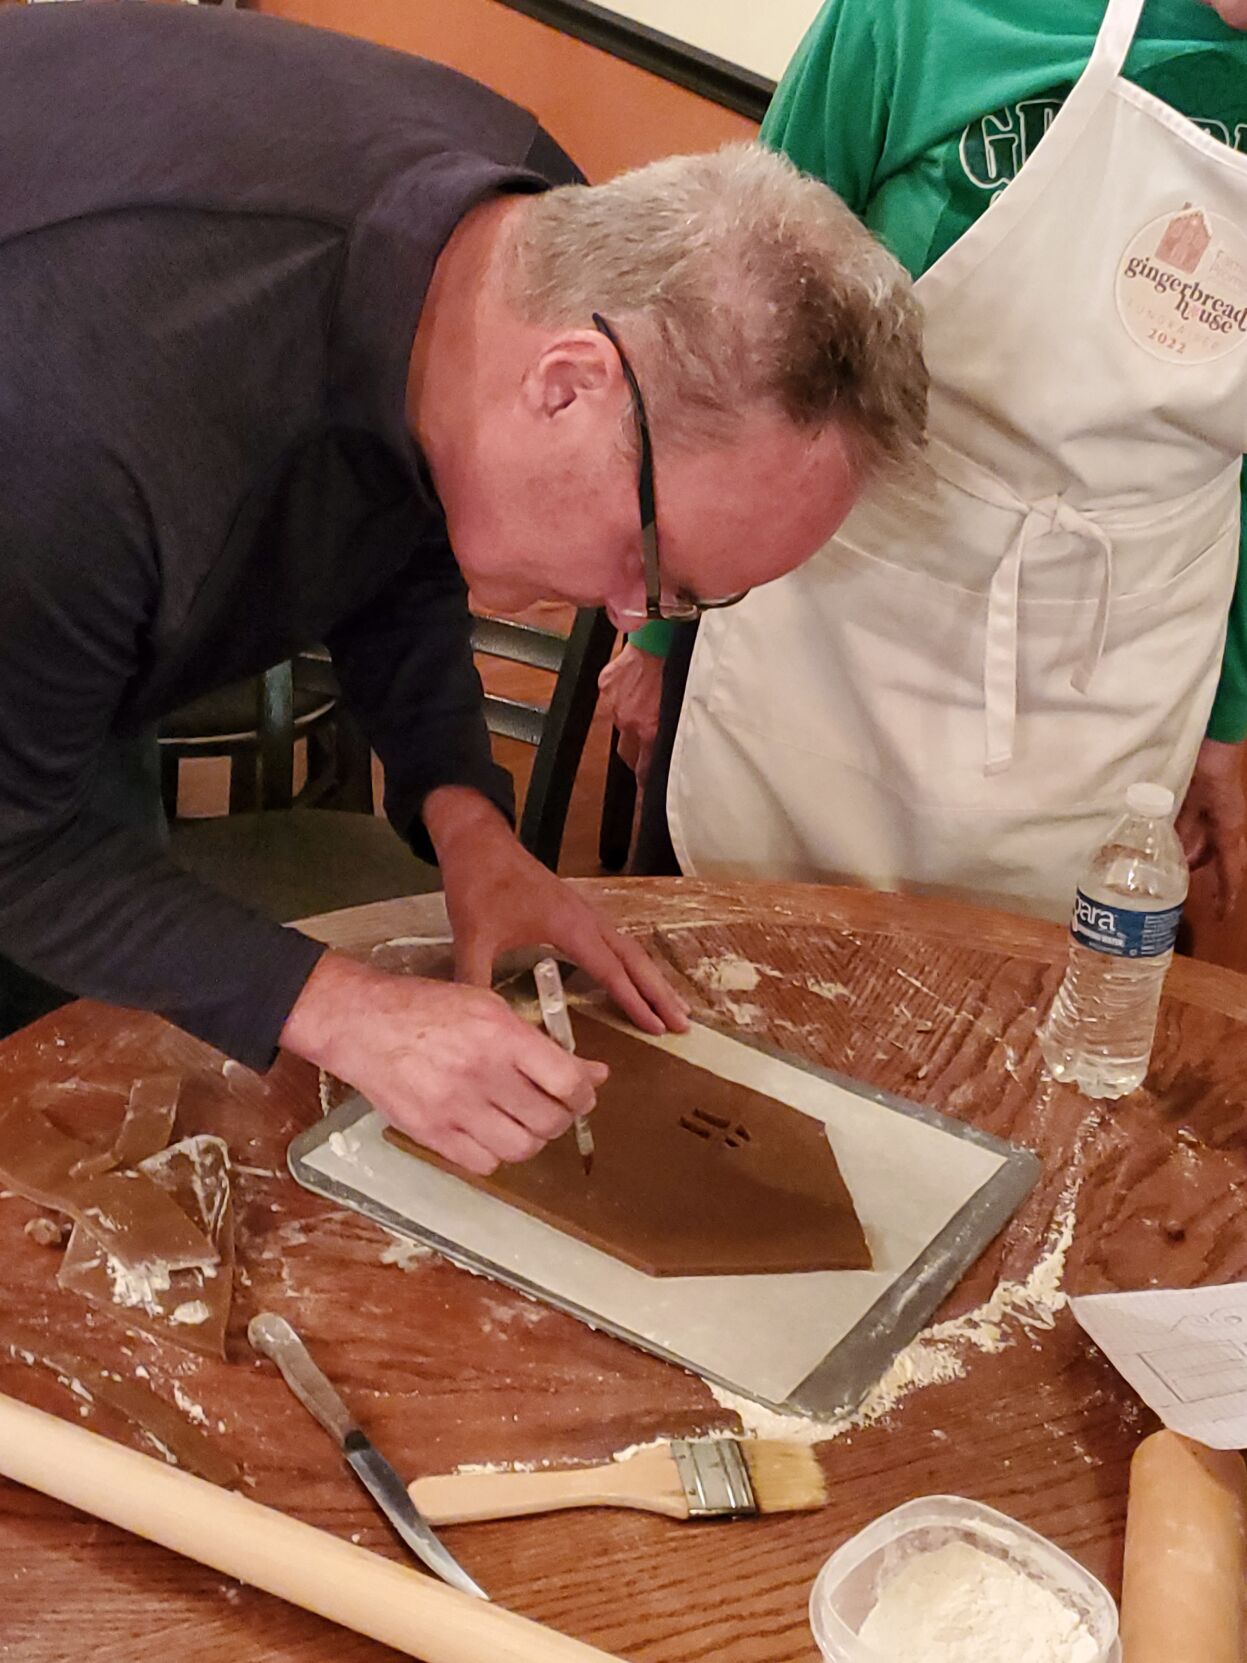
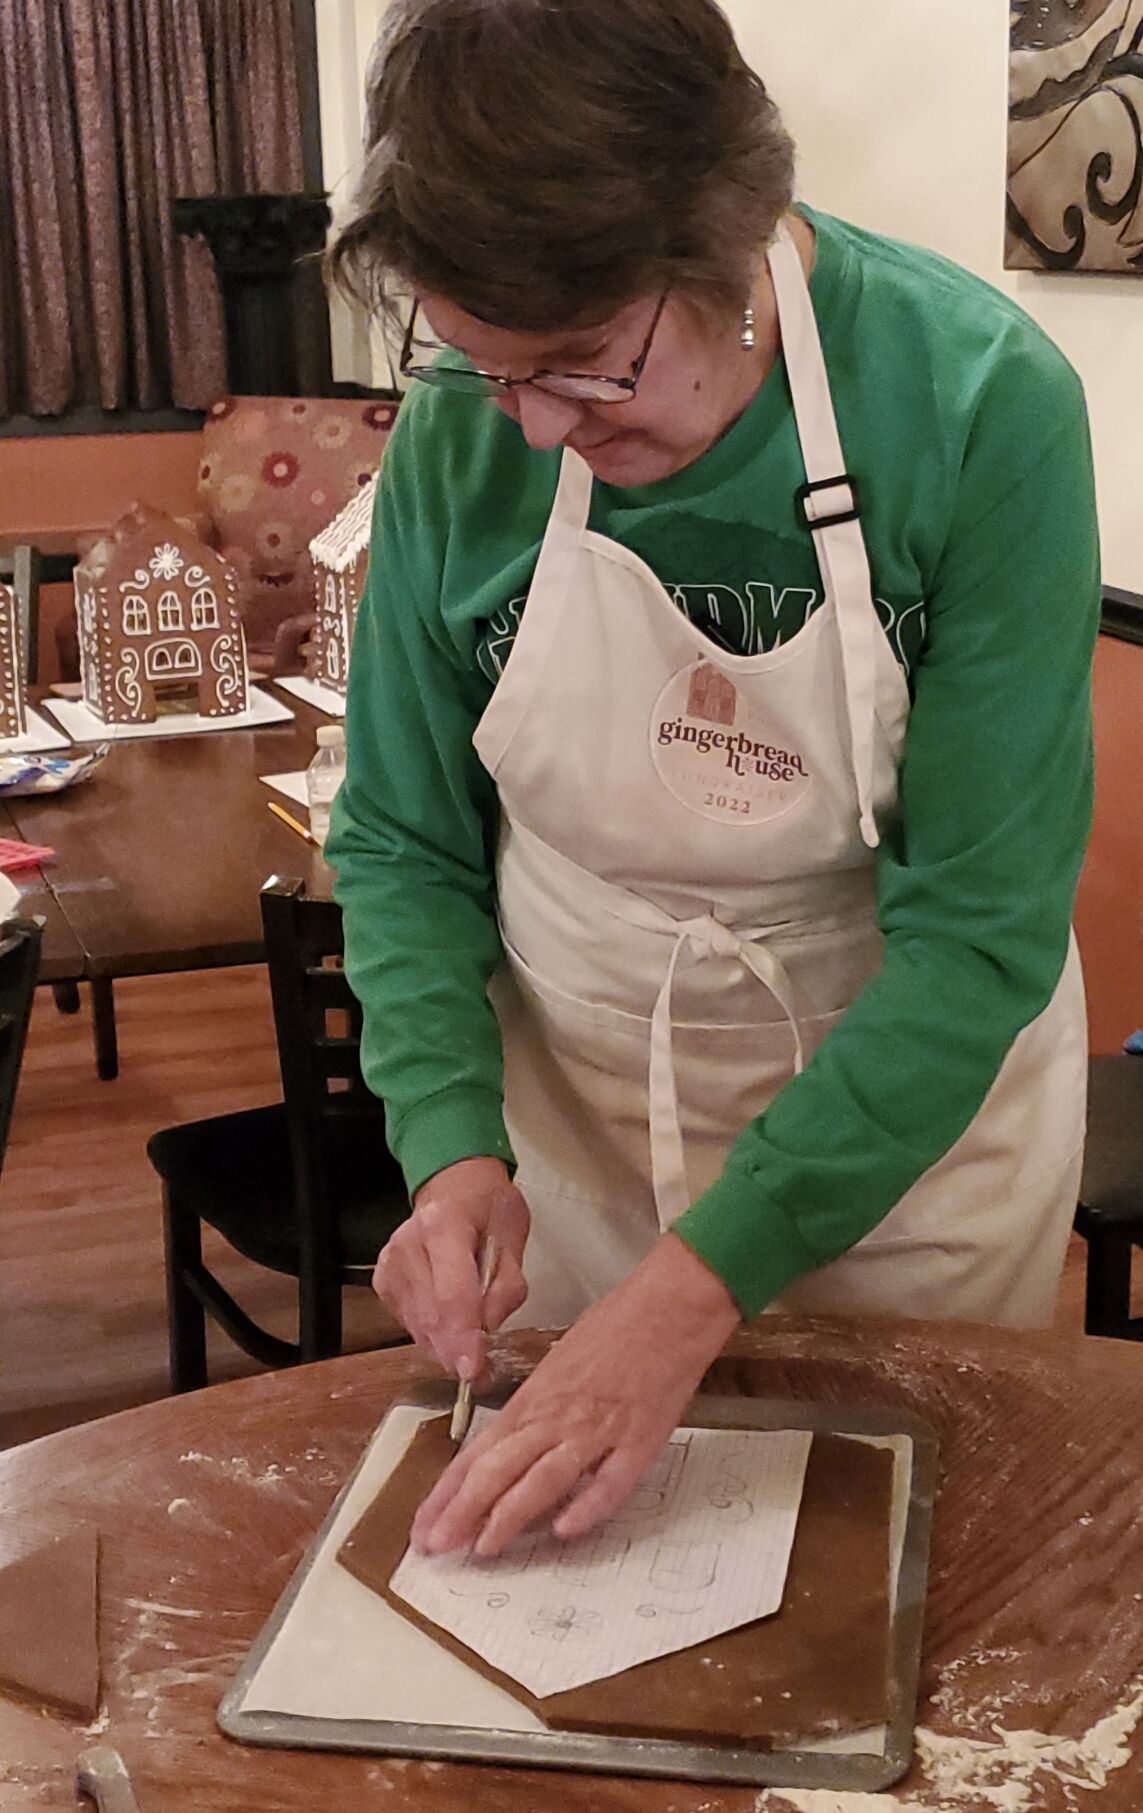
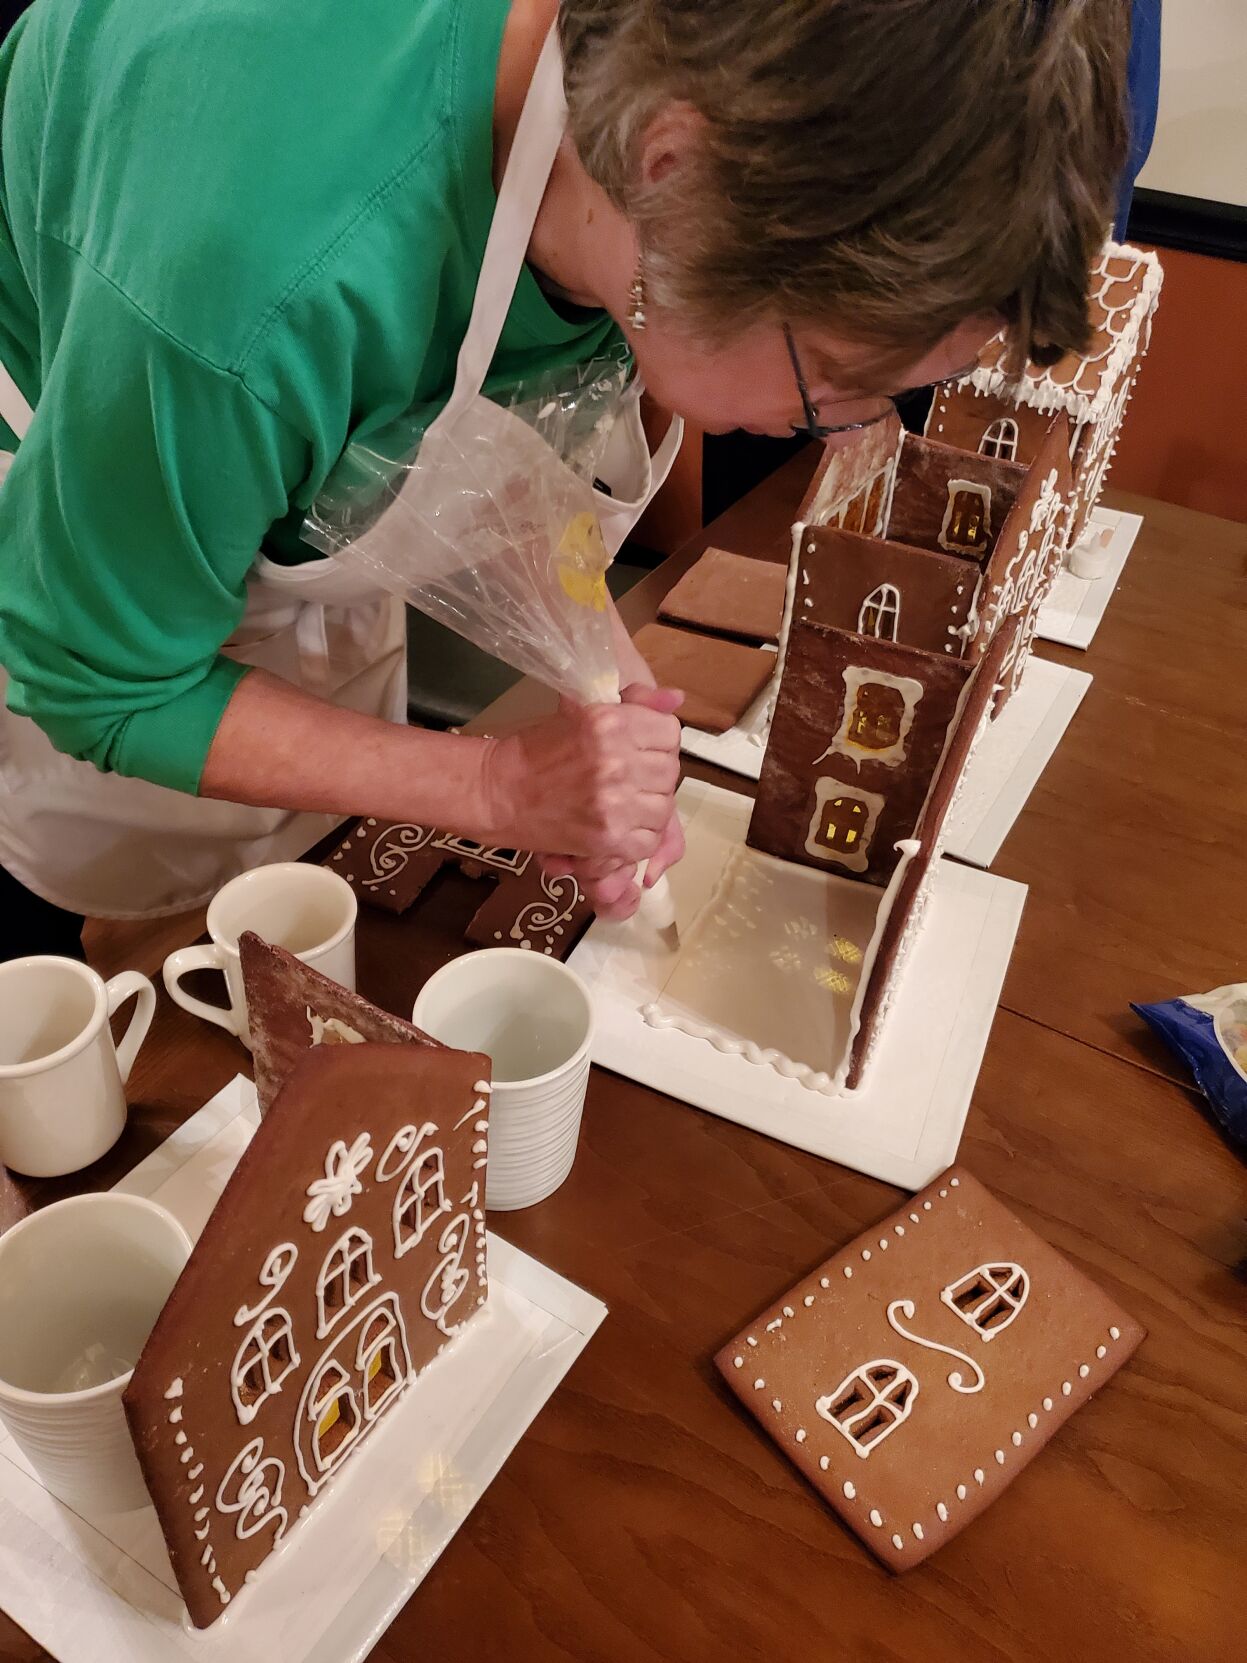
Phase one: Make the dough. Note that the recipe does not include baking soda, unlike most cookies. If you plan to eat the building after the holidays, you can add 1 teaspoon of baking soda, because without it, the cookies have an odd taste and texture, but they are more likely to spread. Refrigerate the dough at least one hour or overnight. Create or copy your pattern pieces. If you want cut-out windows, draw them on your pattern pieces. To create your pattern, first draw the front of the building. Match the sides of the building shapes. Do the same for the roof, but add a little for the eaves, so the roof isn’t so small it could cave in. Try taping a cardboard version together to see if all the pieces fit. Cut out a cardboard base for your building to sit on, masking tape the edges and paint it white. Or, make a base out of plywood. Phase two: Roll out the dough in small batches ⅛- to ¼-inch thick on parchment paper cut to fit your cookie sheets. Try to make the thickness of the dough consistent. Slip the parchment paper and rolled-out dough onto the cookie sheet. Freeze 10 minutes before cutting from pattern pieces. Lay your pattern piece onto the rolled-out dough. Use an X-acto knife or other sharp knife to cut it out, peeling away the extra dough. Save the scraps for re-rolling. For cut-out windows, use a pin to poke strategic holes through the paper pattern and into the dough. Use the holes as cutting guides. If you will have cut-out windows for a light, such as a battery-operated votive candle, leave an opening for it in the back wall. If you are baking several pieces on one cookie sheet, leave an inch between pieces. I like to bake one piece at a time. If the pieces are rolled to the recommended ¼-inch thickness, bake at 350 degrees for about 20 minutes. (Bake a shorter time for thinner cookies.) You are baking just a bit longer than for cookies you’d eat, but don’t burn them! When hot from the oven, push down any bubbles. Check to make sure the edges match the pattern pieces. Use a sharp knife to trim any excess while warm. Slide the parchment paper and warm cookies off of the baking sheet and onto a flat surface. Lay the baking sheet on top and (especially if there are bubbles), put a heavy book on top. Let them cool and dry — preferably overnight. Do re-roll scraps, but note that re-rolled dough will be even more likely to have bubbles. Phase three: Make the icing. Use the heavy glass as a holder for loading up the piping bags. Decorate the building sides with doors, windows, curlicues, etc., using a slightly thinner icing than you will for gluing the pieces together. It is easier to pipe on most icing decorations before assembling. You can even use plastic stencils found in the craft store to paint designs with icing. Add the heavier candy pieces after the building is put together. (If you have cut windows and want to add the look of glass, you can purchase gelatin sheets and glue the pieces onto the back of the windows with a bead of icing. Paint with food coloring.) Let the decorated walls dry overnight or at least an hour. (Don’t refrigerate the unused icing, but do cover it well or load up your piping bags without the tips and cover the end with a little plastic wrap.) Phase four: Have some heavy items ready to brace the walls. Heavy ceramic mugs work well since the handles keep the mugs out of the icing. On your base, pencil in where the walls will sit so that you have square corners. Apply icing “caulk” to two corner lines on the base and appropriate sides of two building pieces, such as the front and one side. Glue them to your cardboard base and along the sides. Prop them in place. Let them dry for at least an hour or overnight. Then, glue the other two pieces to those pieces so that you have four walls together. Phase five: Glue on the roof pieces. Apply icing to the tops of the walls. Place one roof piece on and hold it in place until it is secure and won’t slide off. Apply icing for the second roof piece and anchor it to the top, as well, holding it until secure. Now you are ready for the final decorating, using piped royal icing as the glue. Decorate the roof. Add more embellishments such as candy, marshmallows, gumdrops, M&Ms, etc. to the walls, using the thicker “caulk.” If you left room for an inside light, you can use icing to tack a small piece of cloth over the opening. Your house will last throughout the season. No need to refrigerate. I left one up last year to see how long it would last. By July, it started to collapse on itself because of the humidity, but it was not moldy or buggy.
Construction gingerbread
(This recipe is enough to make a house that is roughly the size of a shoebox.) • ½ pound (2 sticks) unsalted butter • 1 cup white sugar • 12 ounces unsulphured molasses • 3 eggs • 5½ cups flour • 1½ teaspoons salt • 2 tablespoons ginger • 1 teaspoon nutmeg Whisk dry ingredients in a large bowl. (Note that there is no baking soda in construction gingerbread to cut down on the spread. It makes for a dense and hard cookie that doesn’t taste good. If you want to eat your building or use this recipe for cut-out cookies, add 1 teaspoon baking soda.) In a standing mixer or with a hand mixer, blend the softened butter and sugar at low speed, scraping often. Add eggs one at a time, mixing and scraping. While mixing, slowly add the whole 12-ounce bottle of molasses. Add whisked dry ingredients, about a cup at a time, mixing thoroughly and scraping the sides of the bowl and mixing paddle. This is a gooey dough, compared to most gingerbread. Scrape and pat into two large flattened mounds on sheets of plastic wrap. Wrap tightly and refrigerate at least 1 hour or overnight. Will keep several days in refrigerator. Before rolling out, let dough rest at room temperature to soften, or it will be too stiff to roll out. Cut parchment paper to fit cookie sheets. You will only be able to bake one or two building pieces at a time. Remove the parchment paper from the cookie sheet and sprinkle the parchment paper with flour. Roll out half of the dough (one of the two mounds). Flour the rolling pin and roll out the dough on the parchment paper to ¼- to 1/8-inch thick. Decide on one thickness and stick to it. You can keep turning the paper for an even roll. Measure with a ruler or use a rolling pin that has pre-measured sides. Slide the paper and rolled-out dough right onto the cookie sheet and stick it in the freezer for 10 minutes. This will make it easier to cut out and it also lessens the spread during baking. Cut, using patterns, with about an inch between pieces. Save the scraps to re-roll. Bake at 350 degrees for 20 minutes, if cookies are ¼-inch thick. Check that the edges are just a little brown. For cookies rolled out thinner, cut baking time to about 10 minutes. As soon as you take the cookie sheet out of the oven, place pattern pieces on top of the shape(s) to check that edges match the pattern. If there is some spread, trim immediately. Firmly press down any bubbles. Slip parchment paper with shape(s) onto a flat surface. Cover with cookie sheet (and even a heavy book) to tamp down any bubbles. Ideally, let the pieces cool and dry out for a day before frosting and assembling.
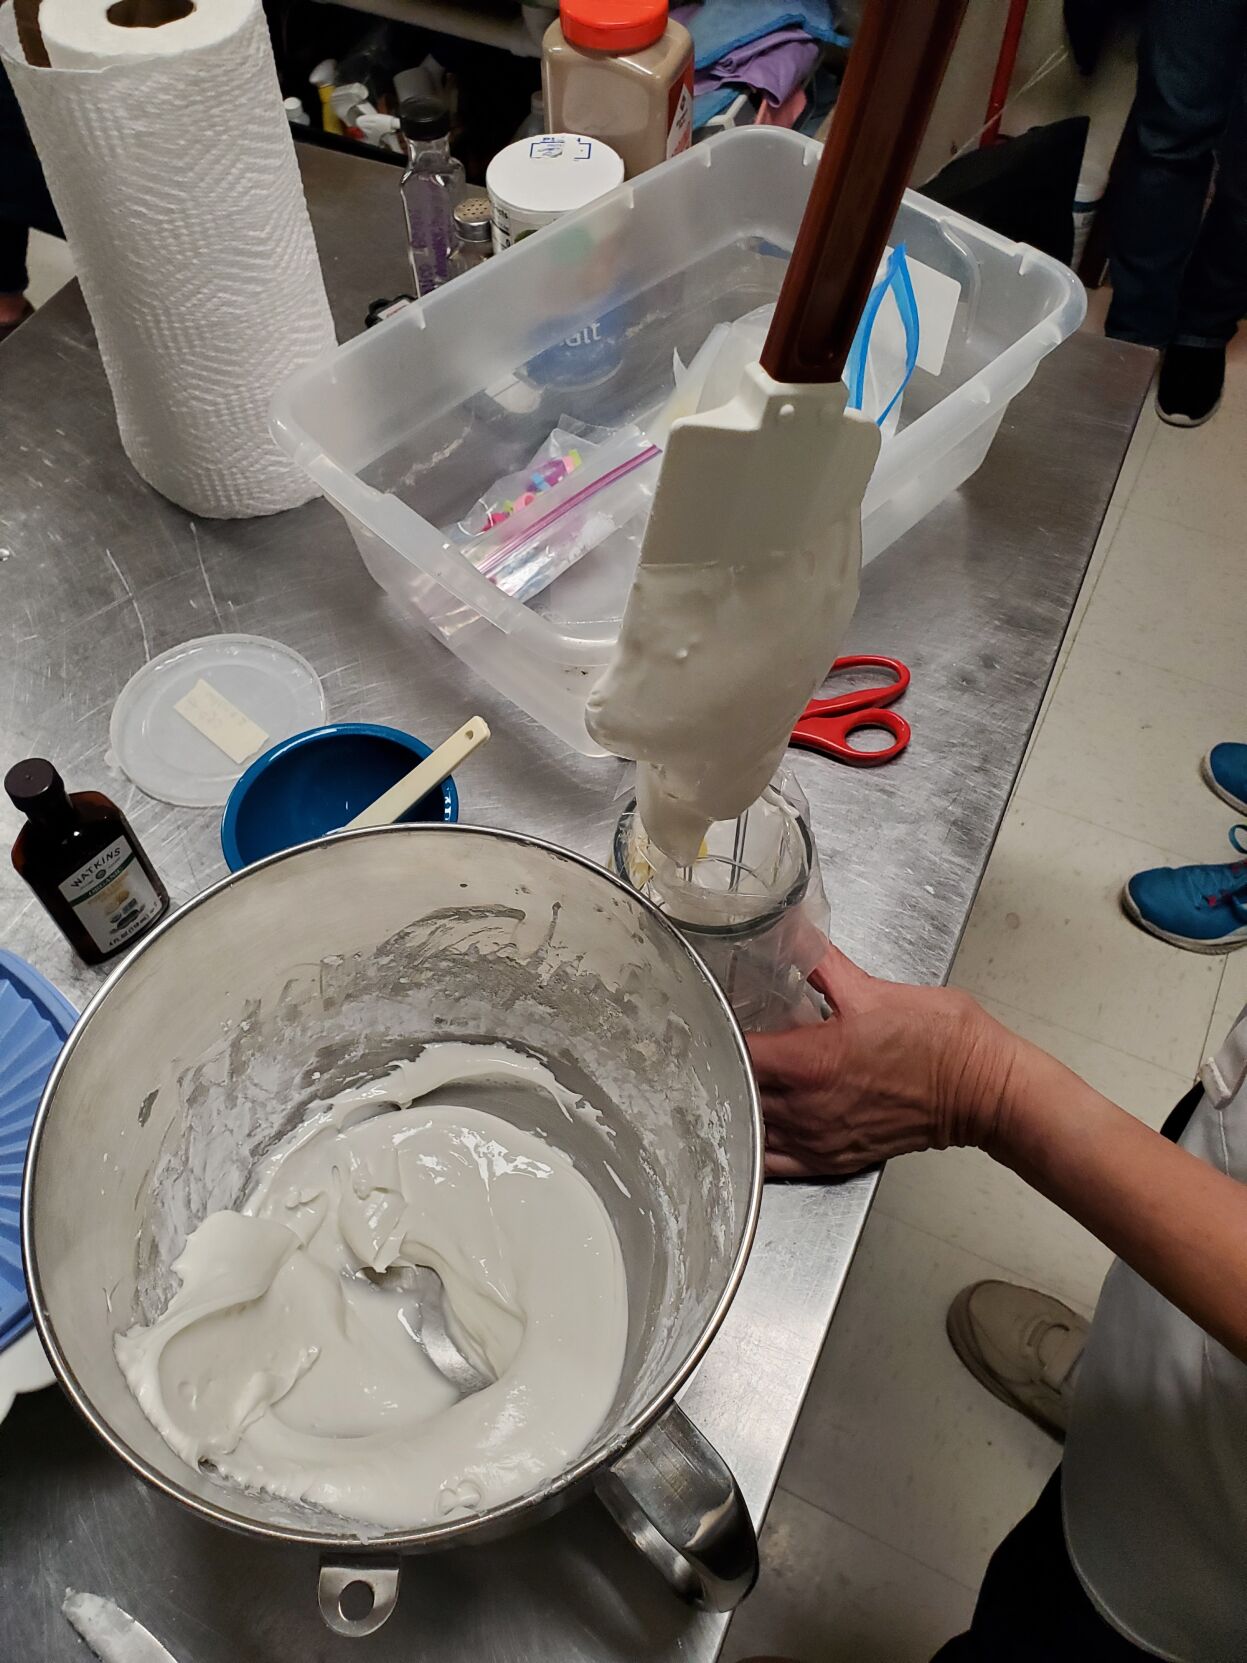
Royal icing
(This recipe can be cut in half.) 2 egg whites 1/8 cup cold water 3½ cups (or more) powdered sugar ½ teaspoon cream of tartar ½ teaspoon flavoring, such as lemon or vanilla extract, optional If using powdered meringue instead of egg whites, cream of tartar is not necessary. Follow directions on the meringue powder box. Whip egg whites and water until just frothy (not foamy). Add sugar, 1 cup at a time (add the cream of tartar with the second cup of sugar). Scrape often. Add the optional flavoring. For use as a gingerbread house “caulk,” the icing should be the consistency of toothpaste. (Icing that is used exclusively to decorate, as with a fine decorator tip, needs to be thinned with a little water or it won’t flow. Try a small batch in a bag with a writing tip before fully loading up.) Fit a disposable plastic icing bag with a large icing tip, such as a No. 10 or a star tip. (It’s also possible to just cut a tip the size you want after filling the bag.) Using a rubber spatula and/or spoon, load up an icing bag. (It helps to prop it up inside a heavy drinking glass.) Close with two twist ties, one close to the icing and a second one a few inches higher (because the icing tends to back up). Or, use a rubber band specially made for icing bags. If you want colored icing, use coloring gels rather than liquid food coloring, which can change the consistency of the icing. Do not refrigerate icing. To store, cover the tip with plastic wrap. Sandye Voight is a retired features reporter for the Telegraph Herald.